Showing posts with label Freezer Fridays. Show all posts

Friday, June 5, 2015

Summer Freezer Meals

Now that it's June, it's officially summer in my book! When the temperatures start to rise, I don't want to be slaving over a hot stove if I can help it. We try hard to keep the oven off as much as possible. That's when I like to rely on the crock pot, grilling outside, no cook dinners or simple meals that can be heated quickly.

Today I've rounded up a few of my favorite freezer meals to have on hand for summertime. Keep these in your stash and you'll be thankful. Whether you're busy with baseball games at night or just plain tired after working all day, these will help your evenings go by much smoother.


Crock pot chicken tacos - Throw a couple bags of this easy chicken mixture into the freezer and let it cook all day in the crock pot. It doesn't get much easier than that. You can serve on tortilla shells or large lettuce leaves and top with your favorite toppings.


Meatloaf burgers - Or really any of your favorite burger recipes. Patties are great to have on hand for the grilling season. We love having hamburgers for dinner and this is one of my favorite recipes.


DIY frozen pizzas - Just because it's summer doesn't mean we have to give up pizza, right? You can certainly bake these in the oven, using one of those pizza pizzazz or on the grill. I love having these in my freezer and you can use any of your favorite toppings.


Zesty Italian melts - Another great sandwich and so simple to make. These reheat quickly in the microwave or oven.


 Burritos - These were a staple in our house growing up. Mom was always adding these to the freezer for us. They reheat quickly in the microwave, or if you like a crunchier texture use the oven.


Marinated Chicken- You'll want to have some different types of these on hand for quick and easy meals. Round out the grilled meat with salads and your favorite garden veggies. Even having fully cooked grilled breasts on hand make for easy sandwiches or wraps. Feel free to use your own favorite marinades, essentially all you will need to do is pour the marinade over the meat once placed into a freezer bag. When you thaw the meat, you'll have a delicious supper all ready to grill up.

Cilantro lime chicken
Zesty grilled chicken
Chicken breasts marinated in Italian dressing
Precooked grilled chicken breasts


I hope I leave you feeling inspired when it comes to summertime meal planning. Remember, it doesn't have to be complicated. Taking a little bit of time on the weekends to meal prep can make a huge difference for the upcoming week!

Friday, March 13, 2015

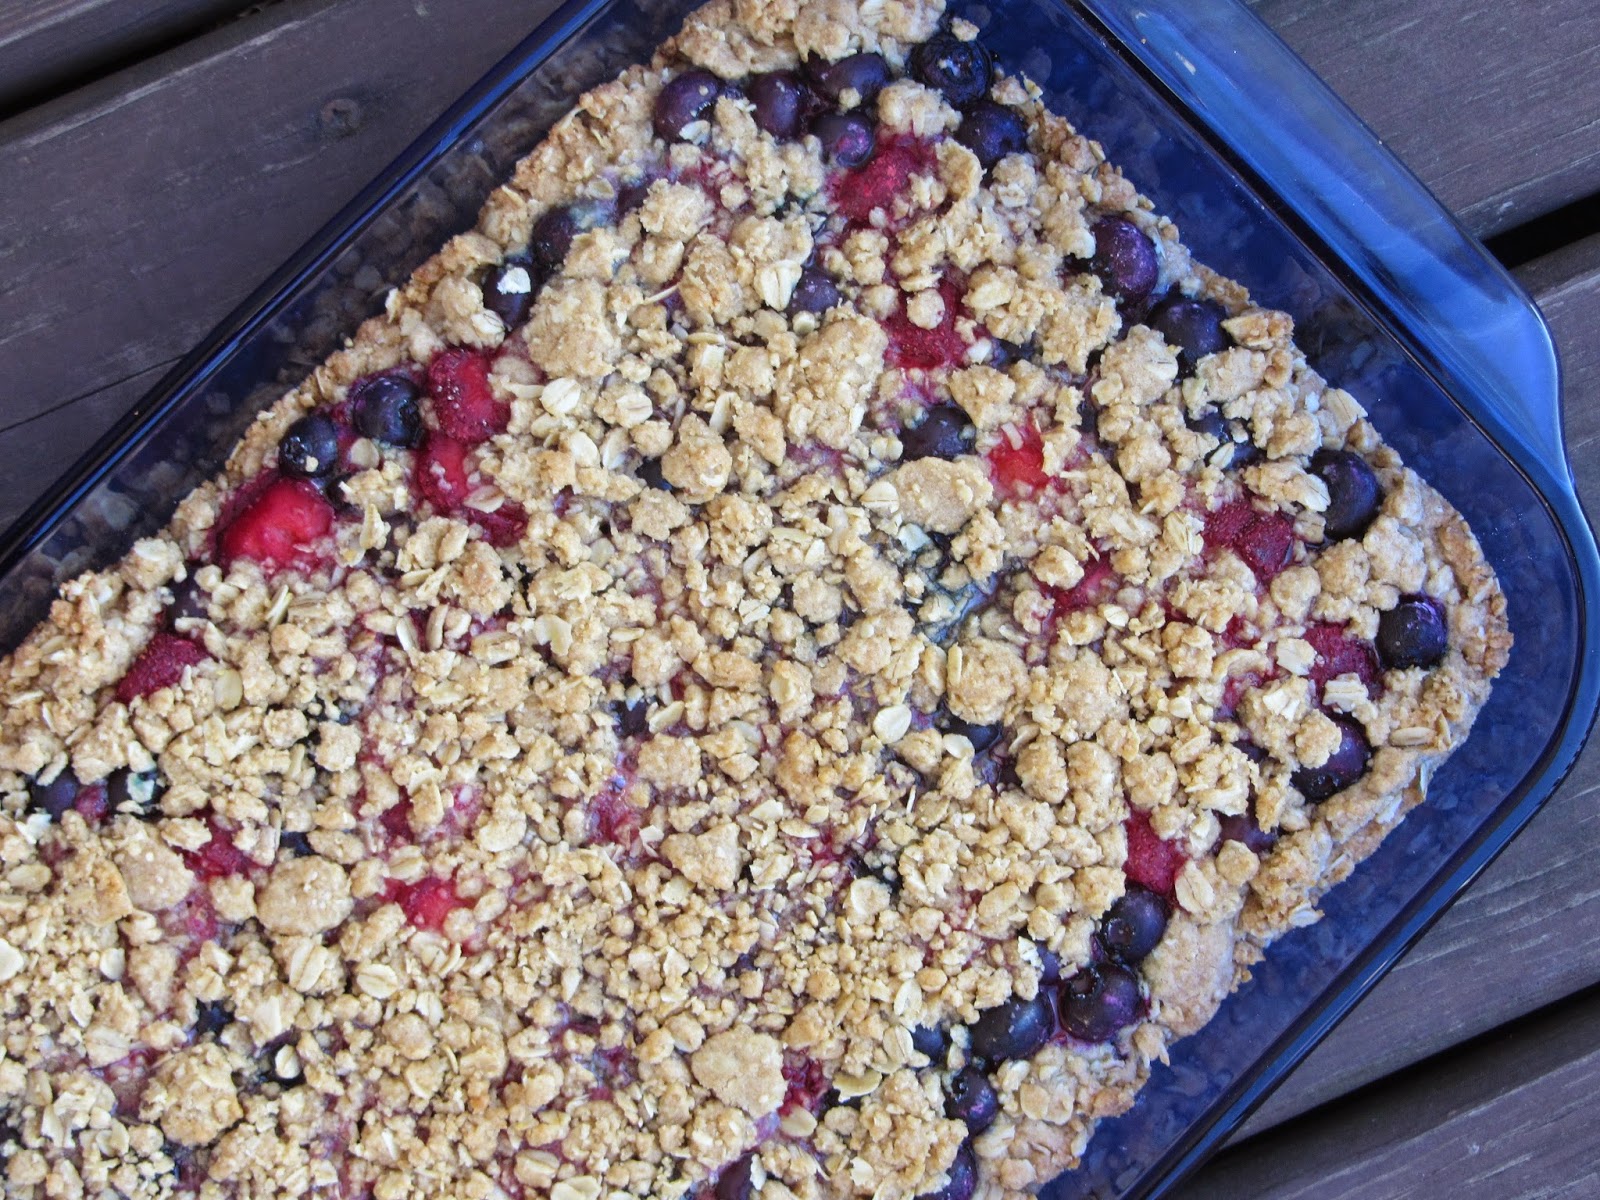
Freezer Fridays: Berry Oatmeal Bars


Whelp, it's officially spring break! I am so thrilled to have a week off from work. I love having the extra time with my girls and as always,  am hoping to get some things accomplished around the house. The weather has been absolutely gorgeous this week, let's hope it continues!

I made these bars on Sunday, I wanted a new breakfast bar to stash away in the freezer. I've made some before using our favorite homemade jams but this time wanted to incorporate frozen berries I had on hand. Making them even more nutritious.


By incorporating whole wheat flour, oats, berries and little sugar; I can feel good about letting the kids have one for breakfast. Or snack. They certainly have to be better than donuts or some cereals.

Of course, as always, one batch doesn't seem to last very long. Good thing I got them in the freezer quickly. As I am sure I'll be making more over my break!


Berry Oatmeal Bars

Ingredients:
1 cup whole wheat pastry flour
1 cup all purpose flour
2 cups old fashioned oats
1 cup brown sugar, packed
1 tsp baking soda
1/4 tsp salt
2 sticks butter,melted
2 cups frozen blueberries
1 cup frozen sliced strawberries
1 tbsp corn starch
1/4 cup sugar

Directions:
In a large bowl, combine both flours, oats, brown sugar, baking soda and salt. Add in melted butter and mix until crumbly. Press 2/3 of mixture into a 9x13 inch baking pan and set aside.

In a small bowl, toss the berries with corn starch and sugar. Sprinkle fruit evenly over the crust. Distribute the remaining oat mixture over top of the berries.

Bake at 350 degrees for 30-35 minutes. Remove from oven and let cool before cutting. Depending on the size of your bars, makes 12.

Freezing instructions: After bars are cooled and cut, wrap individually in plastic wrap. Lay each bar on a pan and place into freezer for at least one hour to flash freeze. Then transfer to a container or large freezer bag to place in freezer until ready to eat. Simply remove from freezer and let thaw for a bit before eating.

Friday, February 6, 2015

Freezer Friday: Butternut Squash Soup


Goodness it's been awhile since I've done a freezer Friday post. Over last weekend I finally put to use one of two butternut squashes that have been sitting on my counter. I love having soups readily available for us to enjoy when the craving strikes.

I package our soups into half pint canning jars and store them in the freezer. It's the perfect size for lunches and all I have to do is thaw and reheat.

Now honestly, most of the time I like to keep the standard chili or maybe even chicken and veggie type on hand. But we have to change it up sometimes, right? Butternut squash is a nice meatless, healthy soup to enjoy. And there are tons of variations you can try. Bacon anyone?


This version is a pretty classic soup. Nothing complicated at all! I definitely recommend serving with a nice chunk of crusty bread. Looks like old man winter will be sticking around for a little while longer, might as well enjoy some comforting dishes while we wait for spring.


Butternut Squash Soup

Ingredients:
1 tbsp olive oil
1 small onion, diced
1 celery stalk,  diced
1 small-med sized butternut squash, peeled and cut into cubes
3 cups chicken or vegetable broth
1 tsp dried leaf thyme
salt and pepper, to taste

Directions:
In a medium-large stockpot, heat olive oil over medium heat. Saute onion and celery for a few minutes. Add in squash and broth, stir to combine. Add in seasonings. Let cook until mixture comes to a boil then cover and reduce to a simmer. Let soup simmer for 30 minutes or until squash is tender.

Remove from heat. Puree soup using an immersion blender. Or let cool a bit and then in small batches, puree using a blender. Serve warm with crackers or bread.

For freezing: divide soup into small containers or jars, let cool completely before storing in freezer. I recommend labeling with the date and contents so you don't forget what it is. When ready to enjoy, just let thaw and then reheat. Makes enough for 6 half pint jars.

Friday, November 7, 2014

Freezer Fridays: Apple Pie Filling


A friend of mine dropped off a couple boxes of apples two weeks ago, I hadn't gotten the chance to pick up any apples from area farmers' markets this season so I was really excited when she stopped over. Now my freezer can be set with applesauce and other treats for the winter.

Apple pie is another favorite that I like to stock the freezer with during this time of year. My family has a little tradition where us girls get together and prepare a bunch of pies to be frozen. It's perfect right before the holiday season hits us and we might be needing a dessert for Thanksgiving or what not. We can then thaw one out and bake and you won't ever tell the difference.


Since time seems to be so limited for everyone right now, I don't expect we'll be getting together to prepare any pies this fall. But that's okay. When that happens I know I can prepare this filling and stash the bags in the freezer for another time. The apples freeze just fine and again, my pie will taste just like I prepared everything fresh that day. If I wanted, I could even make sure I have my pie crust all ready to go in the freezer as well.


If you're lucky enough to still have a nice supply of apples on hand, I highly recommend you add some bags of pie filling to your freezer stash. You'll appreciate it come Thanksgiving time when apple pie is on your menu. Save yourself some time in the kitchen!


Freezer-friendly Apple Pie Filling

Ingredients:
6 cups sliced apples
1/4-1/2 cup sugar {depends on what type of apple you use, mine were a little on the sweet side}
1 tsp cinnamon
1/2 tsp nutmeg
1 tbsp flour

Directions:
In a large bowl combine all ingredients and mix together well. Dump apples into a gallon sized freezer bag. Make sure to label with date and contents. Remove as much air as possible and seal shut. Place in freezer until ready to use.

When ready to prepare a pie, remove from freezer to thaw a bit while you prepare pie crust. Add apples to pie plate and bake as directed.

Friday, September 26, 2014

Freezer Fridays: Spiced Apple Waffles


Waffles are a favorite in our house for breakfast, I usually try to have at least one bag in the freezer at all times. They are quick to reheat in the mornings but never seem to last long enough. A couple weekends ago, I decided it was necessary for us to sleep in and skip one weekend of church service. Mom just needed a break and some relaxation. Of course something special for breakfast was in order. I wasn't surprised when the kids cheered for waffles.

Since apples are in abundance right now, I wanted to incorporate them into our meal. I took my standard waffle recipe and added a little bit of autumn flare to it. We've already got a great apple pancake recipe we love so I knew waffles would be just as good. And they were.


They've got just the right amount of cinnamon spice and taste wonderful with maple syrup drizzled on top. You know that whipped maple butter I made the other day? It will be the perfect addition to these waffles. If you're like me at all and adding tons of apple recipe ideas to your menu plans, make sure to give this one a try. Toss a bag or two in the freezer for weekday mornings, your family will thank you!


Spiced Apple Waffles

Ingredients:
1-3/4 cups all purpose flour {many times I use half whole wheat flour and no one notices the difference}
1 tbsp baking powder
1/4 tsp salt
1 tsp cinnamon
1/2 tsp nutmeg
2 eggs
1-3/4 cup milk
1/2 cup oil {coconut, canola, etc}
1 grated apple

Directions:
In a bowl whisk together all dry ingredients. Add in eggs, milk and oil. Mix together until combined. Add in grated apple and stir well.

Add batter to a lightly greased waffle maker and cook according to manufacturer's directions. Once done, turn waffles onto a plate and repeat with remaining batter. When ready to serve, lightly dust with cinnamon if desired and drizzle maple syrup over top.

For freezing: place waffles onto a large cookie sheet and flash freeze for one hour, or until solid.  Transfer to large freezer bags. Make sure to label with date and contents. When ready to enjoy, simply reheat in the toaster.

Friday, September 19, 2014

Freezer Fridays: Homemade Chili


I made my first batch of chili for this fall season last Friday. It was raining all.day.long. And so cold! It was only right that we warmed our bodies with a bowl of homemade chili. This week we've been able to enjoy these last few days of summer with nice, warm temps. We'll probably squeeze in a few more grilled dinners before it's over, but then I'll be ready to jump right into the soup,stew and chili season.


We've all got our favorite versions of this household staple and mine isn't particularly anything fancy. It's simple but delicious. I don't even really measure out the spices, just add a little bit here and there and taste as I go. But for this purpose, I did try to get some exact measurements for those of you who like to follow the recipe exactly.

I'm not even a big leftover fan; I admit, I've gotten so much better since having lived with my husband. But leftover chili is one of my favorites. I think the flavor gets better as it sits longer in the fridge. It's probably one of the few dishes I don't mind eating more than a couple times.


The best part of this batch? I was able to add seven jars to my freezer stash. They'll be perfect to thaw overnight and pack for our lunches. I can reheat quickly in the morning and pour into a thermos so they'll stay warm until we're ready to eat. I can't wait to work on adding some more soups to the freezer. I can't think of anything more perfect to enjoy on a cold day.


Homemade Chili

Ingredients:
1.5 lbs. ground beef
2-15 oz. cans diced tomatoes
30 oz. can kidney beans,drained
15 oz. can white beans,drained
46 oz. tomato juice
salt and pepper, to taste
2 tbsp chili powder
1/2 tsp garlic powder
1 tsp cumin

Directions:
In a large skillet, brown ground beef until crumbled and no longer pink. Drain grease and add cooked meat to a large saucepan. Add in tomatoes with juices, beans and tomato juice. Mix together well. Season with spices and stir to combine. Taste and season more if needed. Let simmer on the stove for about 20 minutes or until warm. You may also dump all ingredients into a crock pot and let cook on low all day.

For freezing: You don't necessarily have to heat chili if freezing right away. Ladle chili into pint sized jars for individual serving sizes or into larger jars/containers. Make sure to leave a little bit of room at top of container because it will expand. Cover and place into freezer until ready to use. You may want to label if you're worried about not remembering the contents.

When ready to use, let thaw overnight in the fridge. Reheat on the stove. Enjoy right away or place into a thermos if packing for lunches.

Friday, September 12, 2014

Freezer Fridays: Peanut Butter Blondies


It's sure a cold, yucky, rainy day here in Iowa. The older girls are off from school today so that means mom gets the day off too. The youngest is at preschool for a few hours. Gives me a little bit of time to get things done around the house and then enjoy our time together this afternoon. I'm thinking chili is in store for dinner tonight. It's the perfect weather for something comforting and warm!

I made these bars on Sunday for Josh to take to work and share with his co-workers on Monday morning. They like treats and I like making them, it works out perfectly. Then we're not tempted with a whole pan sitting on the counter.


Or what about wrapping each bar individually and stashing them away in the freezer? Besides sharing, that's my favorite right there. Baked goods typically freeze well regardless and it's nice to pull out just a few when you need them. In the kids' lunchboxes or your own, for an after school treat or when traveling in the car. Have a bake sale coming up? Make them a few days ahead of time if you need and freeze like so, you still get a chance to help the cause but without stressing yourself out over lack of time.

Now about these bars themselves; they are quite delicious. Very soft and chewy, full of peanut butter flavor and we love adding the mini M&Ms to the batter. You can definitely change up the add-ins; maybe other chocolate candies, butterscotch or peanut butter chips. Lots of possibilities and no matter what you decide, I know they'll taste great!


Peanut Butter Blondies

Ingredients:
1/2 cup creamy peanut butter
5 tbsp butter, softened
3/4 cup granulated sugar
3/4 cup brown sugar
2 eggs
1/2 tsp vanilla
1 cup all-purpose flour
1/2 tsp baking powder
1/2 tsp cinnamon
1/4 tsp baking soda
1/4 tsp salt
3/4 cup mini M&Ms
1/4 cup chocolate chips

Directions:
In a large bowl, cream together peanut butter and butter until light and fluffy. Add in both sugars, eggs and vanilla. Mix well. Gradually add in dry ingredients and mix until combined. Fold in M&Ms and chocolate chips.

Pour batter into a lightly greased 11x7-inch baking pan. Spread out evenly. Bake at 350 degrees for 45-50 minutes, or until toothpick inserted in center comes out clean. Remove from oven and let cool.

Cut blondies into bars and remove from pan. To freeze: wrap each bar in saran wrap well. Place all wrapped bars in a large freezer bag that has been labeled with contents and date. Or a freezer safe container will work as well. If completely cooled, place into freezer. When ready to enjoy, simply remove from freezer and let thaw.

Makes 18-20 bars

Friday, September 5, 2014

Freezer Fridays: Energy Bites


Well this week has sure flown by fast! Anybody else agree? After being out of town last weekend, I'm looking forward to enjoying some relaxation this time around. Hopefully getting in the kitchen to create some new recipes to share and getting things done around the house. Oh and enjoying these much cooler temps! It's been pretty hot around here lately.

I make these energy bites quite often at home, they make a really good snack. My oldest loves to have these around to munch on when she's hungry. Just a few will do me good, they can be addicting though. Our batches never seem to last long enough.


Rarely do I ever make the same kind either. This recipe is so versatile that you can add in whatever you're craving or currently have in your pantry. I'm not a big chocolate chip person, some chocolate is good but not too much for me. I balanced the flavors out in this batch by combining coconut, dried cranberries and mini chocolate chips. Other times I've done both chocolate and butterscotch. They've all tasted great!

Use this as a guideline but seriously feel free to adapt it to your tastes. Make up a double batch if you have some extra time {I promise, it won't take long at all!} and store the extras in the freezer. When you're craving something sweet or need a quick snack, take a few out and you'll be happy you had these on hand.


Energy Bites

Ingredients:
1 cup old fashioned oats
1/3 cup raw coconut flakes
1/3 cup dried cranberries
1/4 cup mini chocolate chips
1/2 cup peanut butter {I only had chunky on hand this time}
1/3 cup good quality, local honey

Directions:
In a large bowl combine together oats, coconut, cranberries and chocolate chips. Add in peanut butter and honey. Mix together well. Chill in the fridge for about 20-30 mins.

Remove from fridge and using a small cookie scoop, shape mixture into balls. Place into a container and store in the fridge.

*If freezing, flash freeze for about 20 minutes on cookie sheets. Then transfer energy bites to either a freezer safe container or freezer bag. Make sure to label and date with contents. Store in freezer until ready to enjoy. You may eat while slightly frozen or let thaw for about 15 minutes before enjoying.

Makes about 2 dozen.

Friday, August 29, 2014

Freezer Fridays: Pumpkin Zucchini Scones


Last weekend it was certainly very hot and humid here in Iowa. Typical summer weather for us, except it always waits to do this sort of thing after the kids are in school and the pools have all closed for the season. Go figure! But hey, we're just used to it. I really had no plan to do any sort of baking, but we had some big zucchinis on our table that needed used up. Oh and one lone can of pumpkin in my pantry.

These were a total experiment and I'm so glad I decided to take a chance on them. Made with whole wheat flour, pumpkin, zucchini and sweetened only with a bit of honey; I'd say they make for a pretty healthy breakfast option. Since they aren't very sweet I did spruce them up with a little icing drizzle, but you can leave that off if you wish.


Honestly, I wasn't sure what the kids would think of these. Sometimes they don't like my new creations. They surprised me though and kept coming back for more. I froze half of the batch and left the other half on the counter, the container was gone within a day. That tells me they're a keeper!


Pumpkin Zucchini Scones

Ingredients:
1-1/2 cups whole wheat flour
1-1/2 cups all purpose flour
2 tsp baking powder
1/2 tsp baking soda
1/2 tsp salt
1 stick butter, cubed
1 egg yolk
3 tbsp honey
1/2 tsp vanilla
3/4 cup shredded zucchini
1 cup pumpkin puree
1/3 cup buttermilk

Icing:
1 cup powdered sugar
1/4 tsp vanilla
splash of milk, for thinning

Directions:
In a large bowl, combine egg yolk, honey, vanilla, zucchini, pumpkin and buttermilk. Mix together well.

In another bowl, combine all dry ingredients. Using a pastry blender, cut in butter until mixture is crumbly. Then add wet ingredients into the dry and mix just until combined.

Turn dough onto a lightly flour surface and knead a few times. Add a little bit of flour in if needed. Using a rolling pin, roll dough into a large circle or make into two circles if needed. Cut into wedges. I made some of mine smaller for the kids. You should get about 18.

Place scones onto a baking sheet that's been lined with a silicone baking mat or parchment paper. Bake at 350 degrees for 20 minutes or until turning golden brown. Remove from oven to let cool.

To make icing: combine all ingredients into a bowl and mix well. Drizzle icing immediately over the scones.

These also freeze well, flash freeze on a baking sheet before placing in a freezer bag. Thaw and reheat when ready to enjoy.

Friday, August 22, 2014

Freezer Fridays: Homemade Pizza Sauce


As I stared at a big bowl of tomatoes on my counter last week, I tried to think of new ways to put them all to use. Pizza sauce instantly came to mind, it's something we use quite often in our house. Saturday morning, that's what some of my time consisted of. The funny thing was, as I logged onto Facebook quickly, many of my foodie friends were doing the exact same thing. I found picture after picture of tomatoes, peppers and onions roasting away in the oven.

We all had the same idea but I went a different route. I had other things I wanted to get done so I simply threw all of my ingredients in the crock pot and let it do it's thing.


Lots and lots of tomatoes, different varieties, fresh basil and other spices and that was it. I covered the pot and let it cook all.day.long. Towards the end I added in some cornstarch to thicken up the mixture a bit. I didn't even worry about peeling the tomatoes, because I knew I wanted to process the mixture a bit more in a blender so it wasn't a big deal. If you'd rather peel the tomatoes beforehand, by all means, go ahead.


In the end, I came out with a flavorful sauce that will be awesome on our homemade pizzas and just about anything else I can think of. I threw the jars in the freezer so we can enjoy this deliciousness throughout the winter. It will surely be a welcomed treat!


Homemade Pizza Sauce

Ingredients:
15 medium-large tomatoes, chopped
2 garlic cloves, minced {I actually used some garlic scapes from my freezer
10 basil leaves, chopped {don't worry about chopping finely, you'll puree mixture later}
salt and pepper, to taste
1 tbsp cornstarch

Directions:
Add the chopped tomatoes to a large crock pot. Sprinkle in seasonings and stir together just a bit. Cover and let cook on low for 8-10 hours. Add in a tbsp of cornstarch to help thicken the mixture, make sure to stir well so it doesn't clump. Cover and let cook an additional one hour.

Afterwards, turn crock pot off and let sauce cool. Once cooled, in smaller batches, puree mixture in a blender for just a few seconds. It won't take much at all. Make sure to taste and season more if needed.

Ladle into mason jars, I used 3 pint sized jars and 2 half pint. Place lids on and place sauce in the freezer. When ready to enjoy, all you have to do is thaw.

*If you find sauce is still a little too runny even after adding the cornstarch in, before using, just add in tomato paste in small amounts {1-2 tbsp}. That should help thicken up the mixture.

Friday, August 15, 2014

Freezer Fridays: Freezer Salsa


Welcome to Freezer Fridays! I've been brainstorming a lot lately; many of you seemed to really enjoy my 31 days of freezer cooking series and I'd like to continue sharing freezer friendly recipes more often.The goal is to showcase a new recipe each Friday that's perfect for making ahead and freezing. What do you think? Are you game? I hope so!

My tomatoes are really starting to ripen in the garden, it's about time. The girls love going out every morning to check and see what's available for the days picking. Fresh salsa is one of our favorites to snack on in the summer. When you can grab most of the ingredients from the backyard, the store bought versions just don't compare!


I hear year after year that freezing salsa is a great way to preserve some of those tomatoes and enjoy it in those cold, winter months. I figured now was as good of time as any to give that a try. Now, I like to make my batches with lots of chunky veggies rather than pureeing into a smooth consistency. Of course my batches probably won't hold up for as long in the freezer than the latter. I expect the veggies to soften quit a bit when I try to thaw out so I will make sure we use these up within a few months.

Has anyone had great luck with freezing salsa rather than going the canning route? I'd love to hear your tips, please share them below! I'll plan to be back with an update on how these really turn out over time. I'm confident they'll taste great!


Freezer Salsa

Ingredients:
5-6 tomatoes, chopped
1/2 green pepper, finely diced
1/4 cup onion, finely diced
1-2 jalapenos or other hot peppers, finely diced {I don't add very many seeds to mine so that it's mild for the kids}
1 garlic clove, minced
small handful of cilantro, chopped
1 tsp lime zest
salt, to taste

Directions:
Add all chopped ingredients into a medium sized bowl and stir together gently to combine. Taste and add additional seasonings if needed. You may enjoy salsa right away or store in the fridge.

To freeze:  Ladle into 2 pint sized jars until almost full, make sure to leave just a bit of room at the top. Place lids on top and seal shut. Immediately place into freezer and store until ready to enjoy. When ready to use, remove from freezer and let thaw. Serve with tortilla chips. Salsa should keep in freezer for up to 3 months.

Related Posts Plugin for WordPress, Blogger...