Tuesday, March 31, 2015

Baby Shower Fun


Over the weekend my mom and I, along with a couple other family members hosted a baby shower for my cousin. It's her first baby and this was a lot of fun to plan. Today I am going to share with you some of those details,  maybe you'll find some new inspiration if you're planning a shower.


We went with a book theme for this shower, we knew how important reading is to my cousin and how she was looking forward to starting her baby's library. My mom purchased some books to include in each table's centerpiece. We also asked each guest to bring along a book instead of purchasing a card.


Along with the books, each table had these adorable candy pacifiers we made. My mom also made these little booties out of cups. They turned out so cute!


When our guests first arrived, they had a chance to "sign in" at the Late Night Diapers basket. We encouraged everyone to write the mom and dad-to-be a note of encouragement on the diapers.  We're hoping these will help them to smile a little during those late night diaper changes.


Each place setting also had a little something fun for the guests to fill out for the parents-to-be.


My mom did a fantastic job with the food. We were expecting quite the crowd and everything was delicious. We all enjoyed barbecue pulled pork, potato salad, broccoli salad, chips and a relish tray.


I was in charge of the cake as that's sort of my specialty. Keeping with our book theme, I decided on a very hungry caterpillar cupcake cake. Plus I made plenty of mini cupcakes for everyone to munch on. I loved how this turned out, it was quite easy and so fun to make!

Overall we couldn't have been more pleased with our turnout. The shower was a complete success and my cousin received so many wonderful items for her baby boy!
Saturday, March 28, 2015

Chocolate Coconut Candies


What a doozy of a week! I thought we might have avoided any sort of illnesses but man our family got hit hard in the last several days. Nothing too severe, just annoying colds and fevers. Things are looking up though, we're on the mend and hopefully everyone stays healthy the remainder of spring.

It's hard to believe Easter is already next week. I swear it snuck up on us. For our family, it means much for than just the Easter bunny and candy. But you have to admit, it's also fun to partake in those things.

Last year I made a couple homemade versions of popular candy bars,Reese's peanut butter eggs and Twix bars. Both absolutely delicious and fun to make. This time around it's my version of a Mounds bar.


Chocolate and coconut pair very well together in this bite size candy. I had a good time trying different shapes; balls, simple squares and even the ol' Easter egg. Plus they were so simple to make. Surprise the family next week by adding these chocolates to their baskets!


Chocolate Coconut Candies

Ingredients:
7-1/2 cups sweetened coconut flakes
2 cups powdered sugar
14 oz. can sweetened condensed milk
1 lb. chocolate almond bark

Directions:
In a large bowl, combine coconut and powdered sugar. Drizzle in condensed milk and mix well. Press mixture into a 9x13 inch pan. Chill in freezer for one hour or until set.

Before removing from freezer, start melting almond bark. In a microwave safe bowl, melt chocolate in 30 second intervals until melted and smooth.

Remove coconut from freezer. Cut into small squares or make any shape you'd like. Dip into chocolate, shaking off any excess before placing onto parchment paper to set. Repeat process until all candies are covered. Store candies in an airtight container. I have mine in the freezer, but you can certainly leave them at room temp or in the fridge.

Makes about 40

Tuesday, March 24, 2015

Mexi-Chicken Stuffed Shells


I love a good challenge, especially when it involves food. Recently I came across Healthy Solutions Spice Blends'  blogger recipe challenge. I was able to choose from their many blends to create a dish. I went with their authentic chili/taco seasoning,

And I am sure glad I did. Who doesn't need a good taco or chili seasoning? I really appreciated the fact that it's not made with any salt or sugar. We've enjoyed this blend with traditional tacos of course, layered taco dip, my chicken tortilla chili and even in these fabulous stuffed shells.

We love a good pasta dish in our house and I love how the recipe makes plenty. I can feed a crowd or just toss an extra pan in our freezer for another day. I incorporated some of my homemade refried beans into the filling, but feel free to use your favorite store bought version. I won't judge,  I promise.


Go ahead and give these pasta shells a try, maybe even surprise a friend or neighbor with a small pan? You'll be a new favorite, that's for sure!


Mexi-Chicken Stuffed Shells

Ingredients:
2 cups cooked, shredded chicken
15 oz. can black beans, rinsed and drained
1 green pepper, diced
8 oz. cream cheese, softened
10 oz. diced tomatoes w/green chiles, undrained
1/2 cup refried beans
3 tsp healthy solutions taco/chili spice blend
8 oz. grated or shredded cheese
salsa
12 oz. pkg jumbo pasta shells, cooked al dente

Directions:
Preheat oven to 350 degrees. Set aside two 8x8 inch baking dishes or one large 9x13 pan.

Combine shredded chicken,  beans and green pepper in a large bowl and set aside. In a small bowl, combine cream cheese, tomatoes and beans to form a sauce. Pour into the chicken mixture and stir well. Add in seasoning.

Spread a small amount of salsa over bottom of each pan. Scoop chicken mixture into each prepared pasta shell and place into pan. Repeat until all shells are filled. Drizzle a little extra salsa over shells if desired. Then sprinkle with cheese.

Cover and bake in oven for about 25-30 minutes, just until cheese is melted and shells are warmed. Remove from oven. Serve warm with a nice salad. Makes about 30 pasta shells.

* If freezing, prepare all steps up to baking. Then simply cover pan well with foil. Label and date, store in freezer until ready to bake. When ready to prepare, thaw pan and heat in oven for 30 minutes or so.

Saturday, March 21, 2015

Grab some Almonds!


Any almond lovers out there? I always try to keep a small stash on hand, whether it be for homemade granola, adding into cookie dough, topping on salads or a quick snack. They are so good for you and pretty darn tasty too!

Today I thought it would be nice to revisit some of my recipes including almonds and share some of their amazing benefits with you.


I've always known nuts are good to include in your diet but I definitely found some interesting facts. Here are just a few:

*Almonds are among the lowest calorie nut. One ounce contains: 160 calories, 7 grams of protein,  3.5 grams of fiber and 9 grams of heart healthy fat.

*They are an excellent source of many nutrients that help in the development and health of the brain.

*You can store unshelled almonds in a cool, dry place for several months.

*Including almonds in your diet can help with the following: maintaining healthy cholesterol levels, strengthening the immune system, reducing your risk for Alzheimer's disease,  improving skin complexion and regulating blood pressure.

See, lots of good stuff there! Tell me below, what are some ways you work to include almonds in your own diet? I've never baked with almond flour, but that would definitely be one way I'd love to experiment more with almonds.


I've rounded up several of my own recipes featuring this heart healthy nut. We especially like making our own almond butter, it's very easy! Take a peek:

Slow cooker granola
DIY almond butter
Homemade cinnamon/pecan/almond granola
Bite-sized granola cups
Immune boosting cookies
Chicken and broccoli slaw
Apple spiced granola
Chocolate-PB Banana Breakfast Smoothie

I've also recently come across a wonderful company, Nuts.com based out of New Jersey that specializes in all varieties of nuts. I am a big believer in buying local, but I also love supporting close knit family companies like this one. Just a couple items in particular that I love: they roast all nuts and pop corn the same day as they ship your order. They also use recycled cardboard boxes and biodegradable packing peanuts on all packages. And lastly, at the moment they currently offer 250 organic products.

I encourage you to visit their page, learn more about their company and take a peek around at all the almond products they have to offer. I'm especially interested in their almond flour and of course anything chocolate covered looks pretty tempting!


Thursday, March 19, 2015

Scotcheroo Roll-ups


It seriously cannot be Thursday already? Spring break is going so fast! The girls and I have been enjoying our time off. I've tried to plan something little for us to do each day. Monday the weather was beautiful and warm so we went to the park, for a walk, got an ice cream cone and just soaked up as much sunshine as we could. We've gone to the library and also a couple local museums. I suppose nothing as exciting as going out of town for vacation but we're having fun so that's all that matters.

One afternoon we also made these yummy bars. They're just a fun spin on a traditional scotcheroo. I am positive everyone has had one before, but just in case, they are a crispy cereal treat mixed with peanut butter and then topped with a chocolate butterscotch mixture.


They are definitely not good for you in terms of nutrition but such a fun treat to enjoy on occasion.  I honestly had never thought to roll up the bars like this, but after talking with a co-worker around the holidays she convinced me to give it a try. It took me awhile, but we finally got them made. The kids loved them! And I love how the chocolate mess on top is eliminated, makes for less clean up for this mom.


Scotcheroo Roll-ups

Ingredients:
10 oz bag large marshmallows
4 tbsp butter
1 cup peanut butter
6 cups crispy rice cereal
1 cup chocolate chips
1 cup butterscotch chips

Directions:
In a large saucepan, melt marshmallows and butter over medium heat. Stir until smooth. Remove from heat and stir in peanut butter until combined. Add in cereal and mix well. Dump mixture into a lightly greased jelly roll pan or large cookie sheet. Press cereal mixture into pan. Set aside.

In a small saucepan,  melt both chips over medium-low heat. Stir constantly until mixture is melted and smooth. Remove from heat and spread over cereal bars. Then roll up starting with the long end. Once rolled into a log shape, set pan in fridge for 1 hour to chill. Once chilled, remove from fridge and cut into 1/2 inch slices. Makes 20.

Friday, March 13, 2015

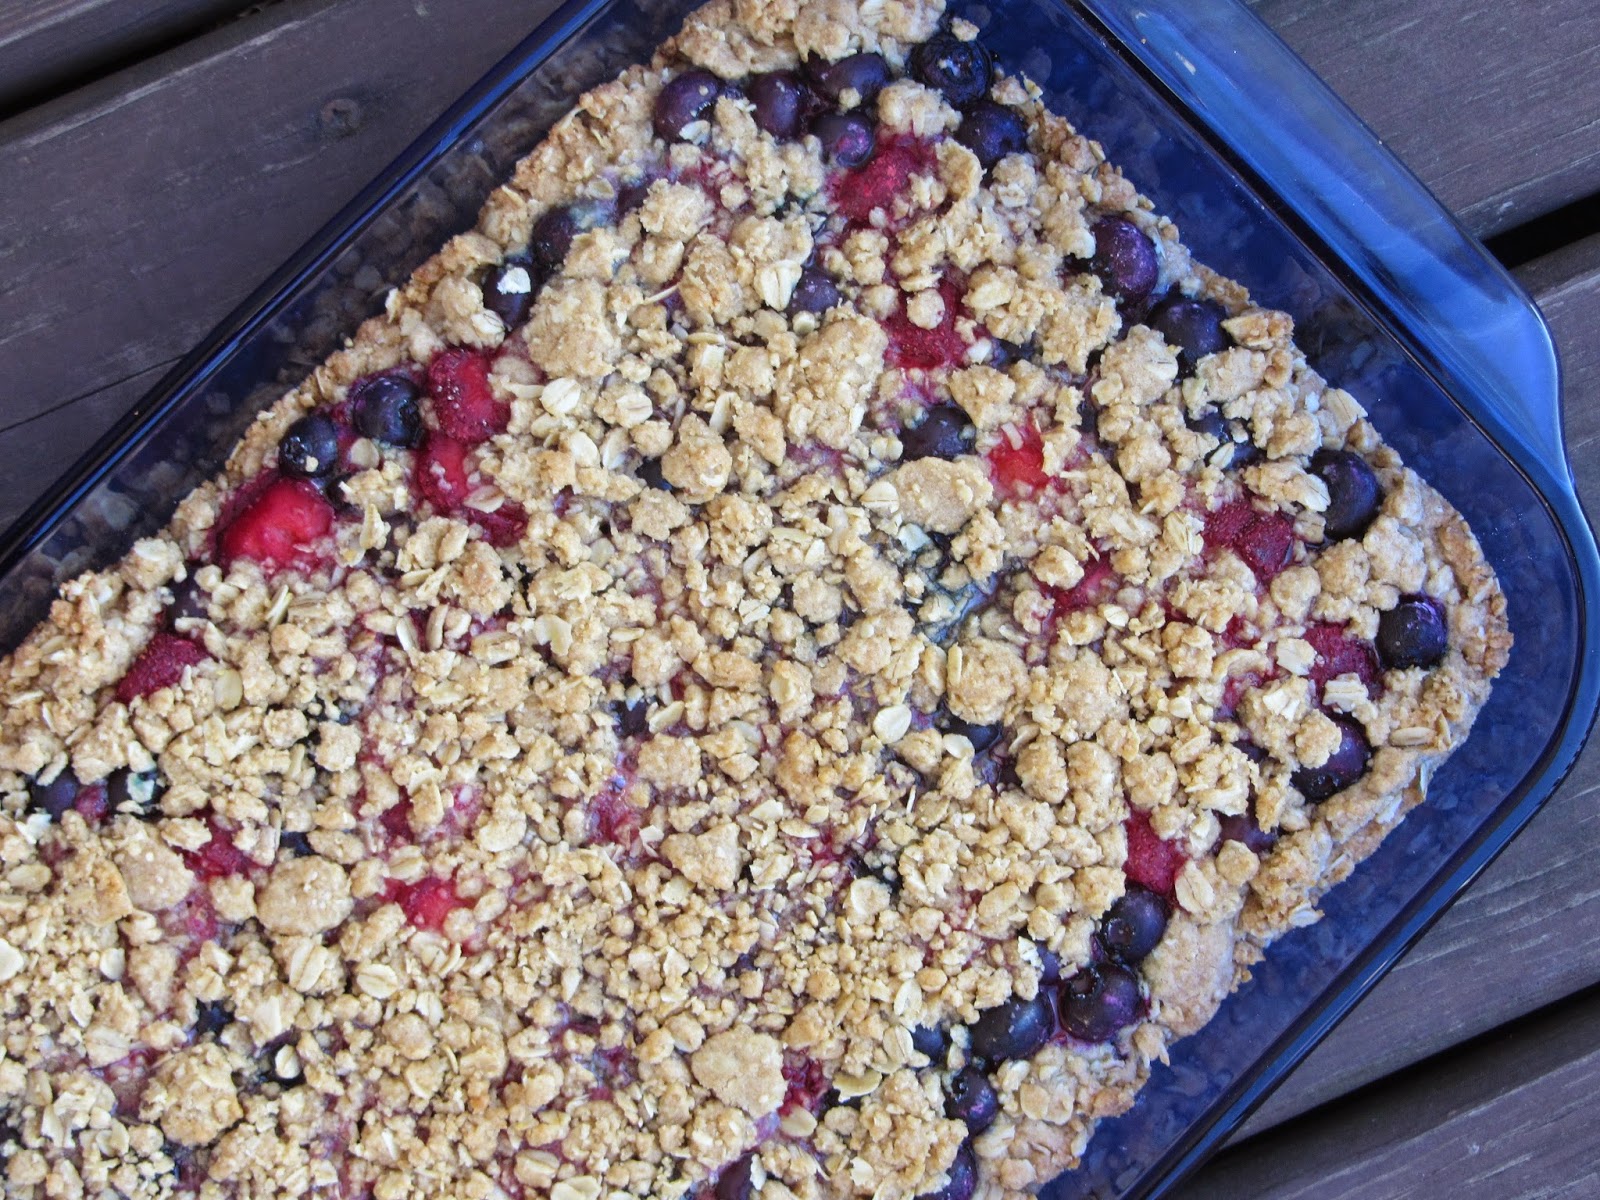
Freezer Fridays: Berry Oatmeal Bars


Whelp, it's officially spring break! I am so thrilled to have a week off from work. I love having the extra time with my girls and as always,  am hoping to get some things accomplished around the house. The weather has been absolutely gorgeous this week, let's hope it continues!

I made these bars on Sunday, I wanted a new breakfast bar to stash away in the freezer. I've made some before using our favorite homemade jams but this time wanted to incorporate frozen berries I had on hand. Making them even more nutritious.


By incorporating whole wheat flour, oats, berries and little sugar; I can feel good about letting the kids have one for breakfast. Or snack. They certainly have to be better than donuts or some cereals.

Of course, as always, one batch doesn't seem to last very long. Good thing I got them in the freezer quickly. As I am sure I'll be making more over my break!


Berry Oatmeal Bars

Ingredients:
1 cup whole wheat pastry flour
1 cup all purpose flour
2 cups old fashioned oats
1 cup brown sugar, packed
1 tsp baking soda
1/4 tsp salt
2 sticks butter,melted
2 cups frozen blueberries
1 cup frozen sliced strawberries
1 tbsp corn starch
1/4 cup sugar

Directions:
In a large bowl, combine both flours, oats, brown sugar, baking soda and salt. Add in melted butter and mix until crumbly. Press 2/3 of mixture into a 9x13 inch baking pan and set aside.

In a small bowl, toss the berries with corn starch and sugar. Sprinkle fruit evenly over the crust. Distribute the remaining oat mixture over top of the berries.

Bake at 350 degrees for 30-35 minutes. Remove from oven and let cool before cutting. Depending on the size of your bars, makes 12.

Freezing instructions: After bars are cooled and cut, wrap individually in plastic wrap. Lay each bar on a pan and place into freezer for at least one hour to flash freeze. Then transfer to a container or large freezer bag to place in freezer until ready to eat. Simply remove from freezer and let thaw for a bit before eating.

Wednesday, March 11, 2015

Brussels Sprout Salad


Mother nature finally seems to be on our side. The snow is melting, the air is warmer and I think spring is near by. Warmer weather makes me anxious for more time outdoors and all the fresh produce that comes with spring and summer.

I find myself craving salads about this time of year. Lighter meals trade places with those hearty casseroles. Salads like this one are my favorite! And before you tell me you hate brussels sprouts, you need to at least try this dish. It reminds me of the ever so famous broccoli salad. Except the dressing is so light, almost to where you don't even know it's there.


This salad definitely gets better with time, but make sure to eat it up within a few days. The apples will get a little soft. My own girls even liked it, except for one. I'll take it though...and keep trying.


Brussels Sprout Salad

Ingredients:
9 oz bag shaved Brussels sprouts (I found these at my local Target in the produce. If you can't locate any, just try shredding whole sprouts in a food processor)
5 slices cooked bacon
2 tbsp reserved bacon fat
1/2 red onion, sliced
1/3 cup white wine vinegar
3 tbsp raw honey
2 tbsp stone ground Dijon mustard
1 apple, sliced thinly

Directions:
In a medium pan, heat reserved bacon fat. Add in onion and let cook for about two minutes, just until tender. Add in vinegar, honey and mustard. Whisk together until combined, let cook together for one minute.

Dump brussels sprouts into a medium sized bowl. Drizzle onion mixture over top and toss all together. Add in crumbled bacon and sliced apple, mix together well.

You may serve immediately but I recommend letting salad ingredients marinate for a few hours. Store in fridge for up to three days.

Friday, March 6, 2015

Baked Ham & Cheese Sandwiches


How's your week been? It's been a pretty good one around here, busy of course.  Our youngest daughter celebrated her fifth birthday on Wednesday. We didn't plan much for this year and kept the celebration just within our own family. But we treated her to dinner out (a rare treat!) and she was thrilled to bring cupcakes to school for her friends.


I'm curious to know, do any of you choose to not throw elaborate birthday parties for your children? Not that there is anything wrong with that, of course parties are lots of fun. In this day in age I just was wondering if families still opt to keep birthday celebrations low key?


Life has just been busy lately and I guess I really haven't shared some of those changes with all of you. Most of you know I have since gone to work outside the home, I am with our local public school system at a nearby preschool. I love working with this age group as it's so familiar to what I was already doing. I also am working Friday nights and Saturdays at a local grocery store for some extra money. And lastly, I have begun taking a course two nights a week for my full time job. I just finished the first eight week term and next week begin another class. In the fall I will complete one more and then hopefully be done with that.

Some days it feels like a lot of my plate, but I have quite the support system at home so that helps. Blogging is still a passion and something I will always strive to keep doing, even if I can't publish posts as often as I'd like to. Please know that I appreciate your loyalty, and knowing that you keep reading and coming back for more is what keeps me going!

Like so many of you, dinner many nights is something quick for us. We've made these a few times and have always liked them. They're especially good during the warmer months with salads, fresh fruit and veggies. Sort of like picnic type food. Or even during tailgating season as handy appetizers. Feel free to use your own favorite types of cheese in here.


I know these would make for a nice freezer meal, I will have to add them to my list for my next session.


Baked Ham & Cheese Sandwiches

Ingredients:
1 pkg (12 rolls) King's Hawaiian rolls
1 lb. good quality sliced ham
sliced cheese, your choice
3 tbsp melted butter
1 tbsp brown sugar
few dashes of Worcestershire sauce

Directions:
Mix together melted butter, brown sugar and Worcestershire sauce. Brush mixture on inside of buns.  Layer each roll with a couple slices of ham and then cheese. Baste any remaining butter mixture onto tops of sandwiches.

Arrange sandwiches in a large baking dish, 9x13 should work fine. Cover with foil and bake at 350 degrees for 20 minutes or until heated through and cheese is melted.

Related Posts Plugin for WordPress, Blogger...